At 2.6 billion monthly active users, Facebook is the most ubiquitous social platform in the world. It’s also no longer just a platform for sharing cat pictures with friends. A lot of business gets conducted on Facebook. That information needs to be reflected in your CRM.
A Facebook CRM integration lets you record and manage business conducted on Facebook. Porting important Facebook data into your CRM does two primary things:
- It keeps your team from having to manage multiple platforms
- It ends the process of manual data entry
Here’s how to keep your team running fast and lean by connecting your CRM to Facebook:
Why you should connect your CRM to Facebook
Most businesses use Facebook for two things:
- Paid advertising
- Facebook Pages
In both of these instances, there is a lot of important business information being handled by Facebook. That information could be anything from a new lead that converted from an ad or a customer that sent your page a message.
It’s all too easy to lose track of that data unless you sync it with your CRM.
A Facebook CRM integration makes sure that your team never forgets to take action on the business opportunities being created on the social network. It also eases their workload. Sales teams are often overwhelmed with calls, emails, and meetings. The last thing they need to worry about is staying on top of Facebook messages or page posts as well!
Connecting your CRM to Facebook also saves time by automatically handling tasks that would otherwise add up to hours every week. Below, I’ll cover some of my favorite Facebook CRM automations that you can set up with Close.
Connecting Facebook + Close
Close connects to Facebook through Zapier. Their free plan and grow-with-you model of pricing make them a great option for most businesses.
To get started, create a Zapier account and select the two or more apps you’d like to connect. For this guide, we’ll be using Zapier to connect Close to one of the following four Zapier apps:
- Facebook Lead Ads
- Facebook Pages
- Facebook Messenger
- Facebook Custom Audiences
Zapier automations start by choosing an app and a trigger. Zapier waits for a trigger to be set off and then runs the automation that you built (called zaps).
The next step is selecting a second application to perform an action. For most of this guide, you’ll be using Close as the app where an “Action Event” will be performed.
There are many different Facebook CRM automations that you can create through Zapier, but this guide will cover the few that I think are most practical for sales and marketing teams.
Potential Facebook CRM Use Cases
Add new leads from Facebook to Close
When you get a hot lead from a Facebook Lead Ad you’ll want them to be immediately imported into your CRM so that sales reps can take action on it. Responding to a lead quickly could be the difference between a won or lost opportunity.
Here’s how you can automate the process so that new Facebook leads get handled right away:
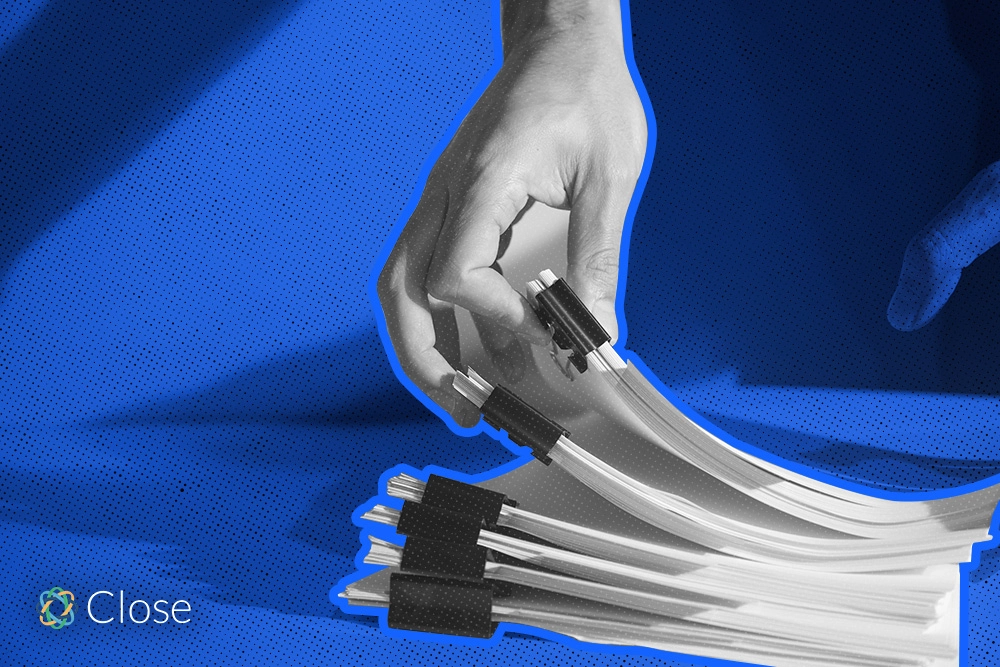
In Zapier, create a new zap, select Facebook Lead Ads as the first app, and “New Lead” as the trigger event. Connect your Facebook account, and under the “Customize Lead” tab, select Page and Form that you would like to pull in new leads from.
 |
Test that step so that Zapier can pull in one of the leads that has already submitted that Facebook Lead Ad form. If it’s a new form, use the Facebook Lead Ads Testing Tool to create a new test lead and then retest this step in Zapier.
Nex, select Close as the app you’d like to connect and choose “Find Lead” in the “Choose Action Event” dropdown. Connect your Close account and choose the field from your Facebook Lead Ad Form that you’ll use to search in Close and see if the Lead already exists.
If your form contains fields for the company name or email address, you can search using those. If searching for an existing Lead by email address, select “Exact Match” in the “Exact Or Partial Match?” dropdown.
Click the checkbox next to “Create Close Lead if it doesn’t exist yet?”. Input all of the relevant info you have about your new lead from the Facebook Lead Ad Form into the appropriate fields.
If all you want to do is create a new Lead in Close from every Facebook Lead, then you’re done! If you’d like to assign those new leads to someone on your team and make sure they take action on it, follow the steps in the next section.
Assigning new leads from Facebook
To assign leads to users you’ll need to first set up a Lead Owner Custom Field in Close. Instructions can be found in our Help Center.
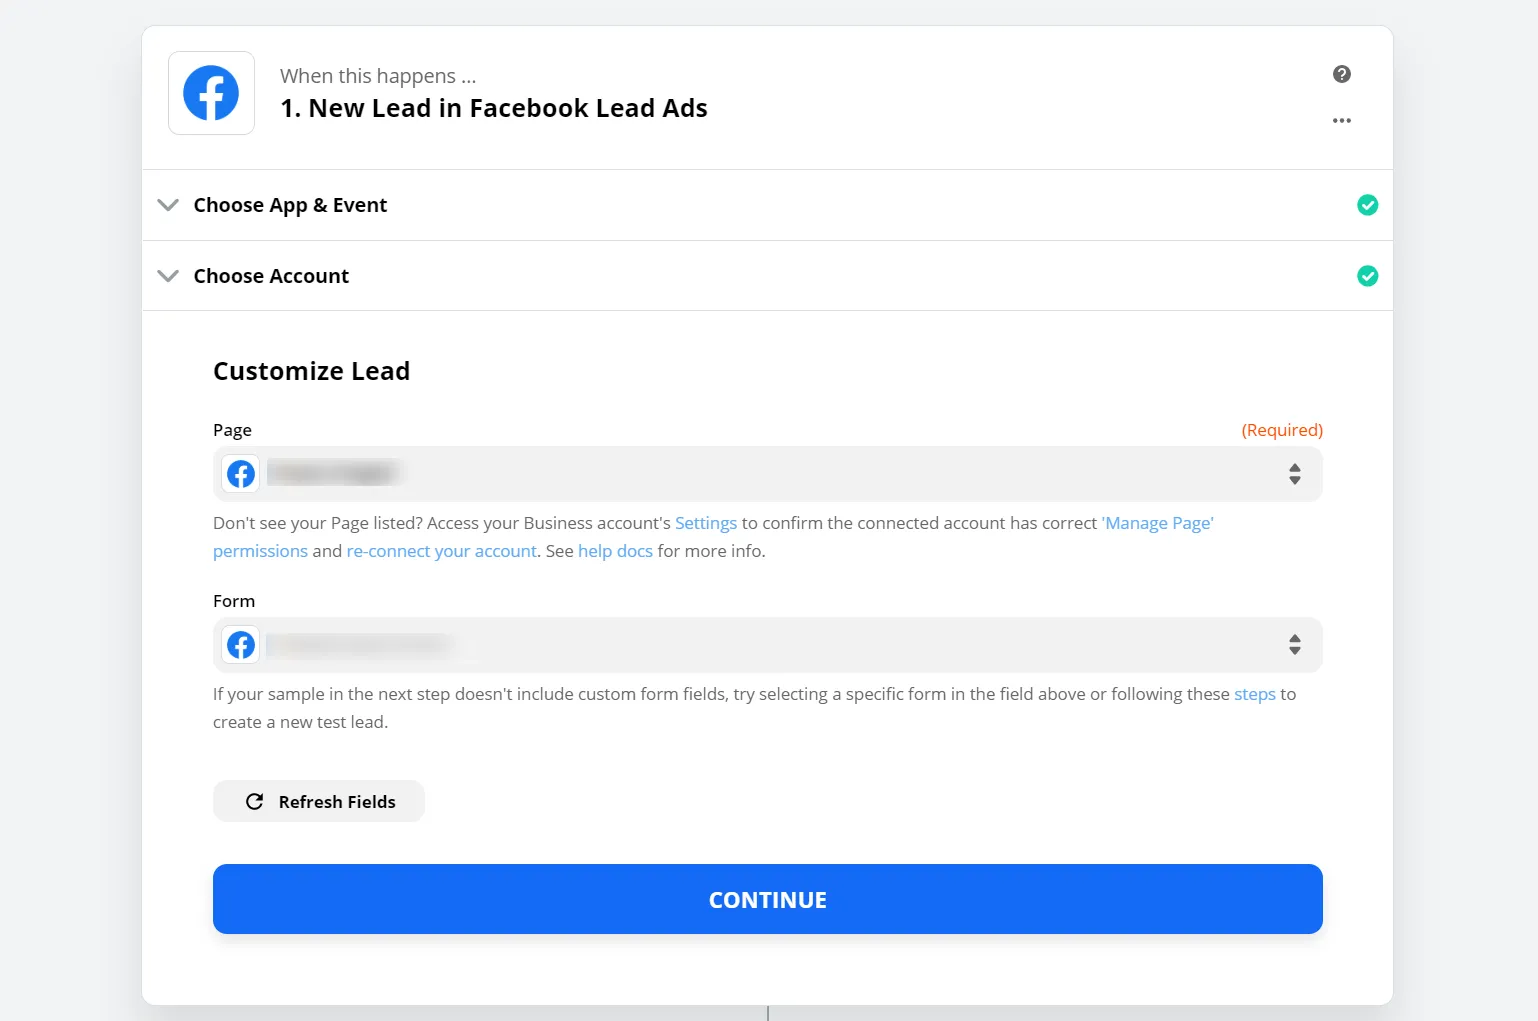
In the Zap we created above, add another step to the end of the workflow and select Close as the app and “Select Random User” in the “Choose Action Event” dropdown. In the “Customize User” tab, select “User” under the “Role(s) To Select From” dropdown.
 |
Select Close again as the next app and “Update Lead” in the “Choose Action Event” dropdown. In the “Customize Lead” tab, select the “Lead ID” dropdown, click “Custom” and select “ID” from step 2.
Look for the Custom Field called “Lead Owner” that you created earlier and select “ID” from step 3 in the dropdown.
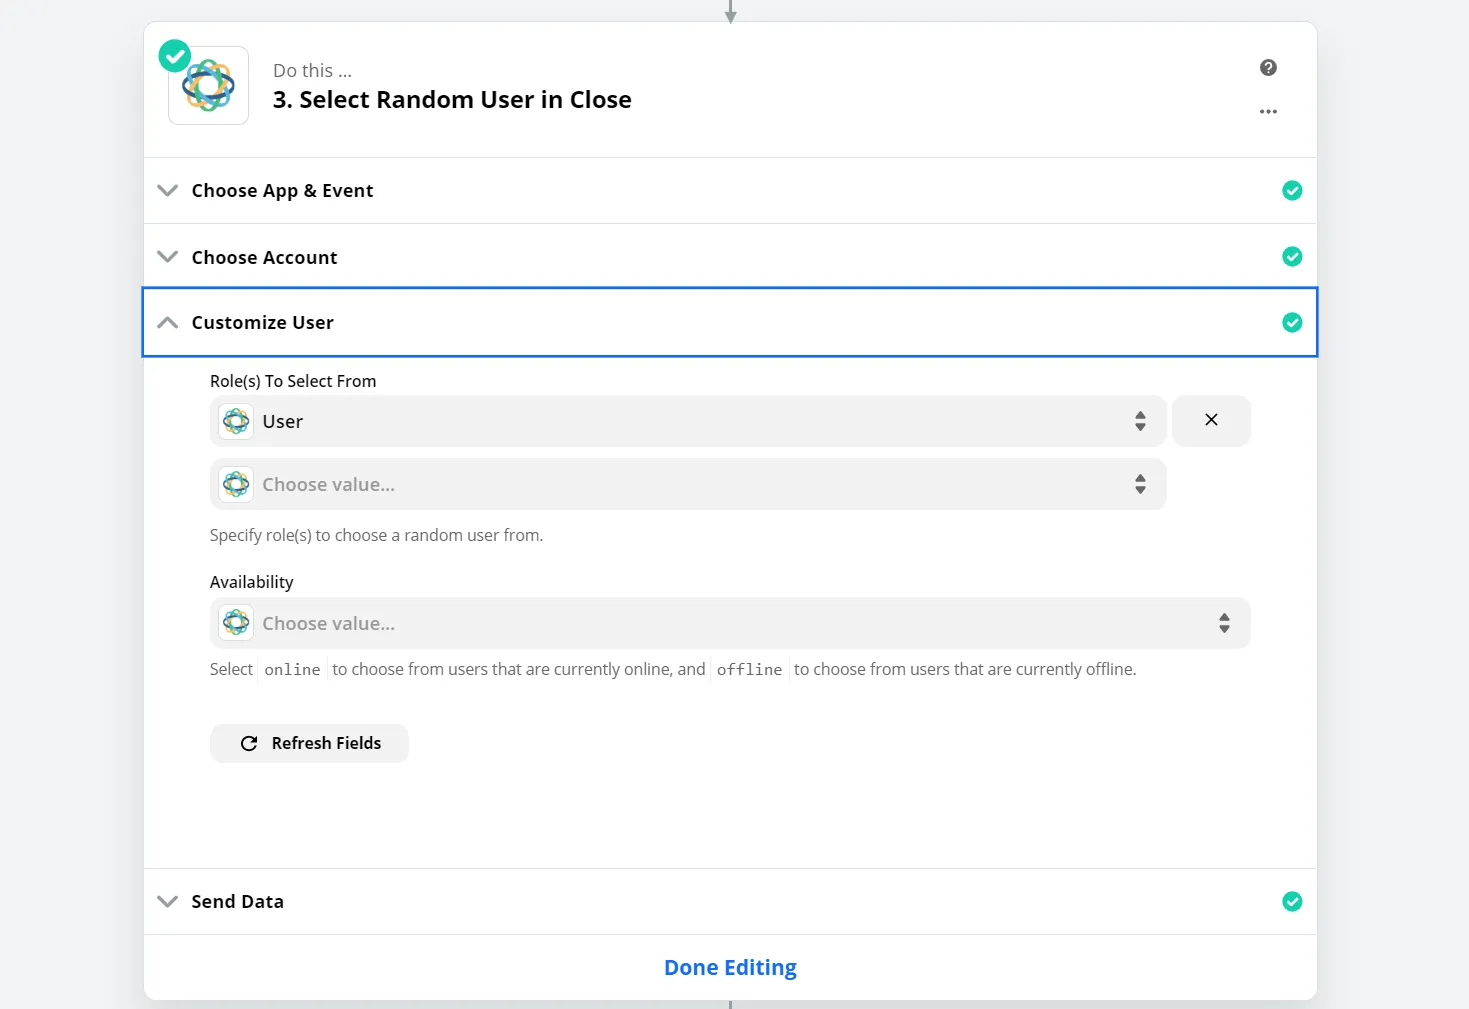
You can finish the zap here, or assign a new Task to that user to make sure that they follow up on this new Facebook lead. To do that, add another step to the Zap, select Close and choose “Create Task” under the “Choose Action Event” dropdown. In the “Customize Task” tab, go to the “Assigned To” field, select “Custom” and “ID” under the step 3 tab. Under the “Lead” field select “ID” under the step 2 tab. Input a due date and text under the respective fields.
 |
Now, the right rep will be reminded to send important information before the meeting or to follow up once the meeting is done.
Notify your team of new Facebook messages
Many prospects or customers now opt to send questions to your business through its Facebook page rather than email. It’s easy to miss these types of inquiries when they’re coming in from multiple channels, so it’s best practice to always make sure that they’re imported into your CRM.
Create a new zap, select Facebook Messenger, and choose the Facebook Page that you’d like to use for this automation.
Select Close as the second app to connect and select “Select Random User” under “Choose Action Event”. Under the “Customize User” tab, select the role types that you want to pull a random user from. This random user will be the person on your team assigned to reply to the Facebook message. If you’d like a particular person to always be tasked with replying to all Facebook messages then ignore this step.
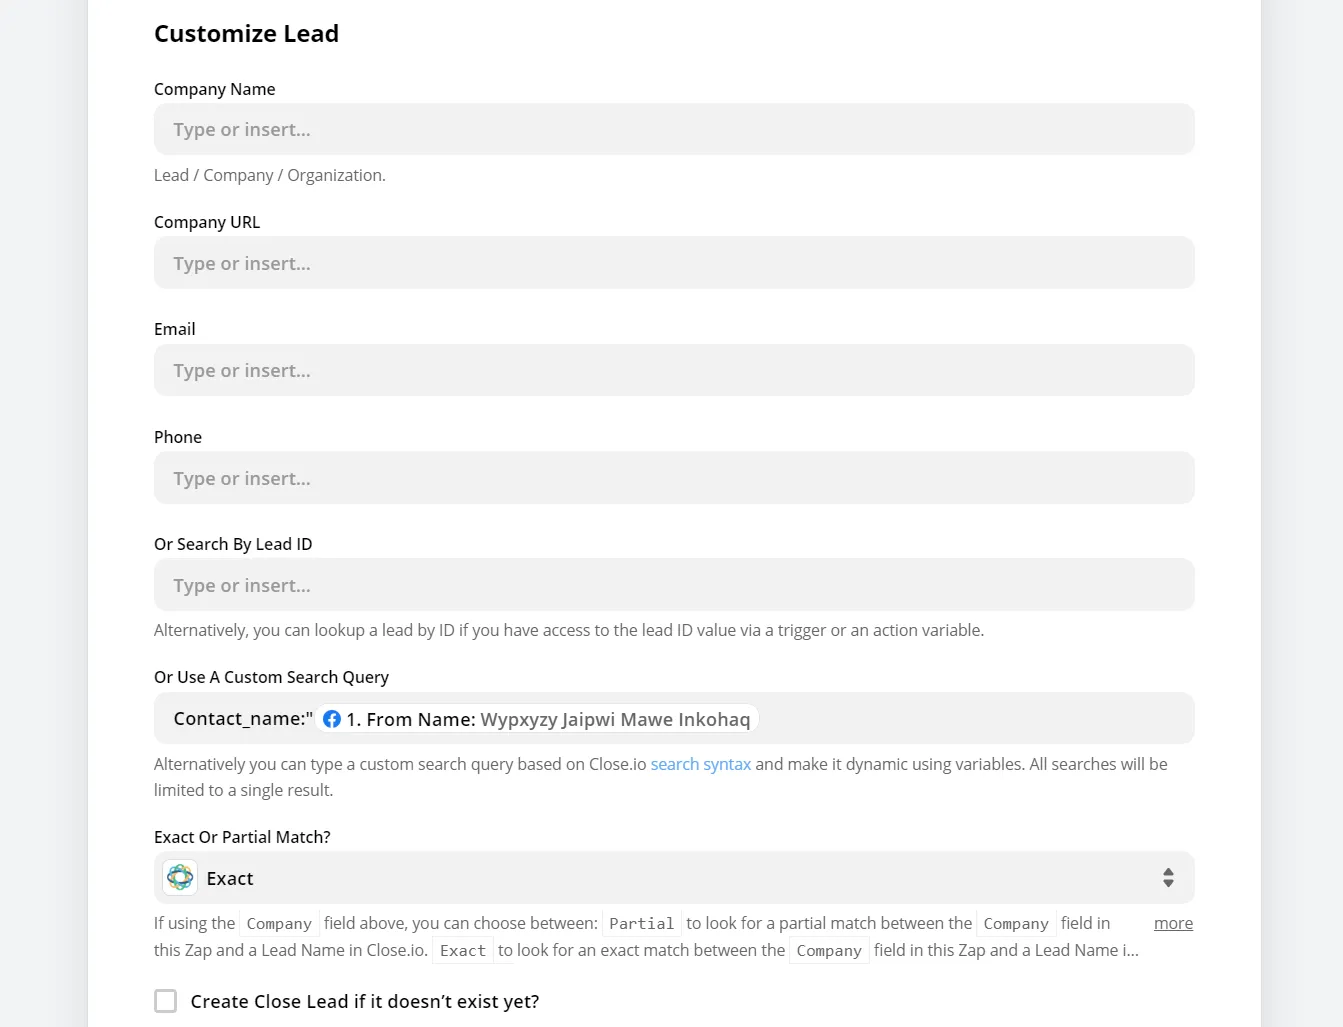
Select Close as the next app to connect and select “Find Lead” under the “Choose Action Event” dropdown. Under the “Customize Lead” tab, navigate to the “Or Use A Custom Search Query” field and input the following:
This uses the name of the person who messaged you to try and search for an existing Contact in Close. Select “Exact” in the “Exact Or Partial Match?” dropdown.
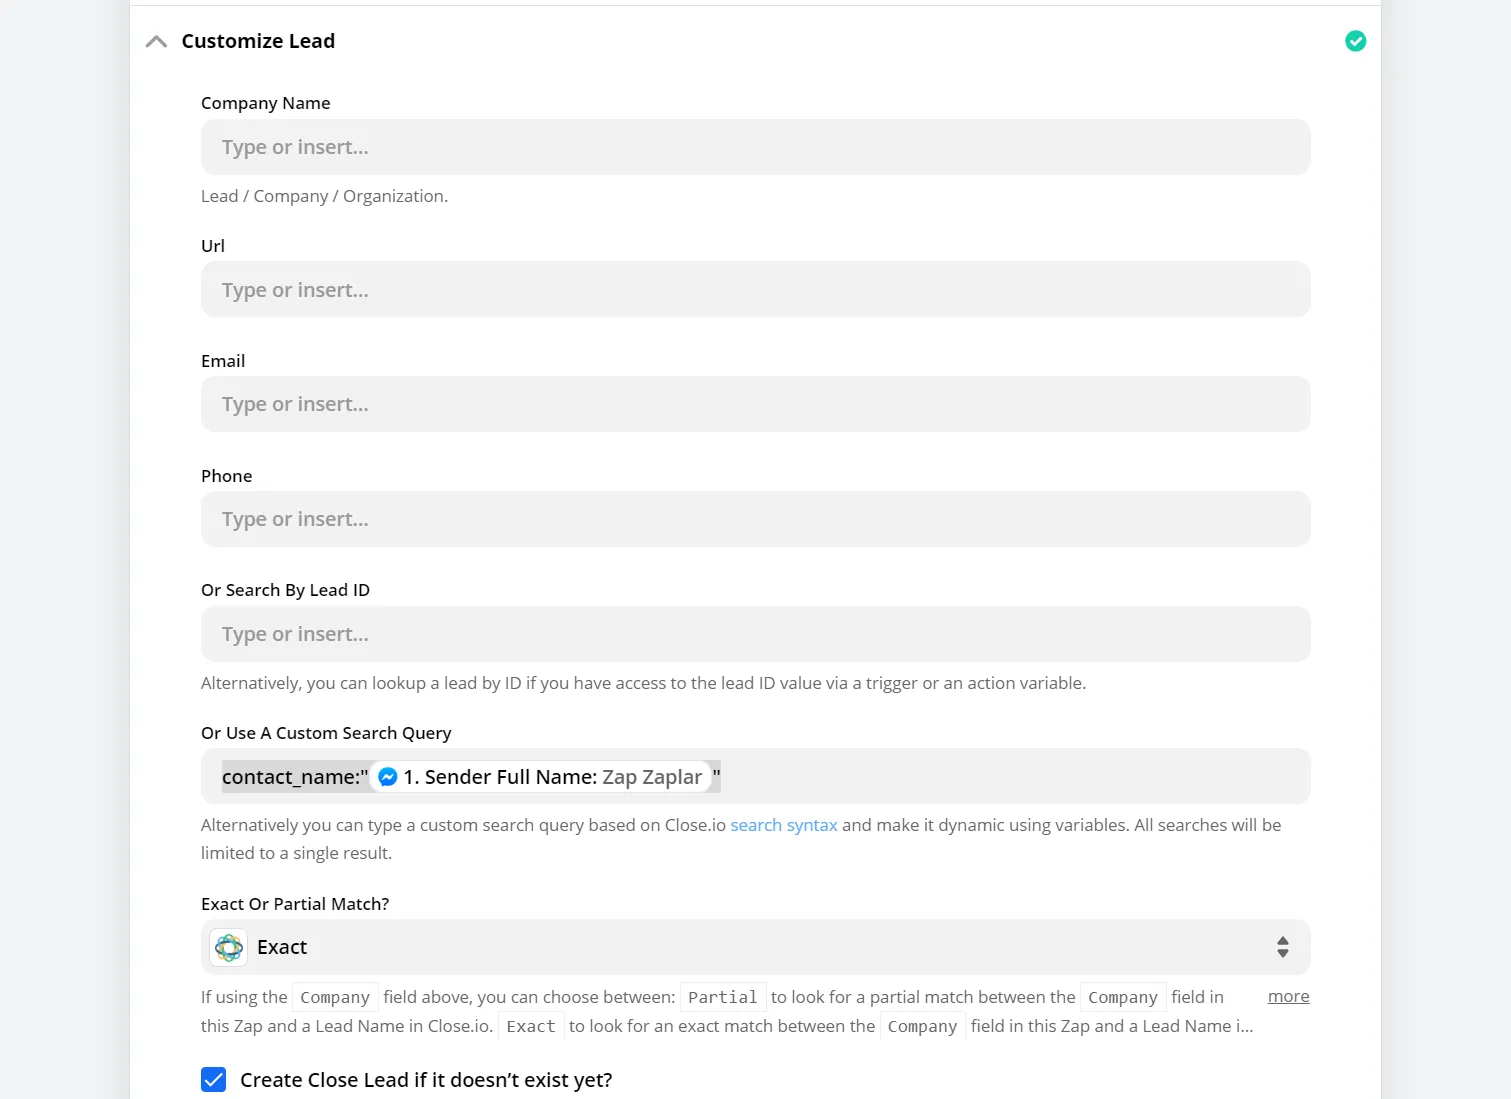 |
Click the checkbox next to “Create Close Lead if it doesn’t exist yet?”. Input all of the relevant information that you have about this new lead. At a minimum, we recommend selecting “Sender Full Name” under the “Contact Name” field and creating a Note with the following text:
Select Close in a new step of the zap and choose “Find Task” under “Choose Action Event”. Under the “Customize Task” tab enter the following description:
Select “Incomplete” under the “Is Complete” dropdown. Enter the “ID” from step 3 under the “Lead ID” dropdown. Click the “Create Close Task if it doesn’t exist yet?” checkbox.
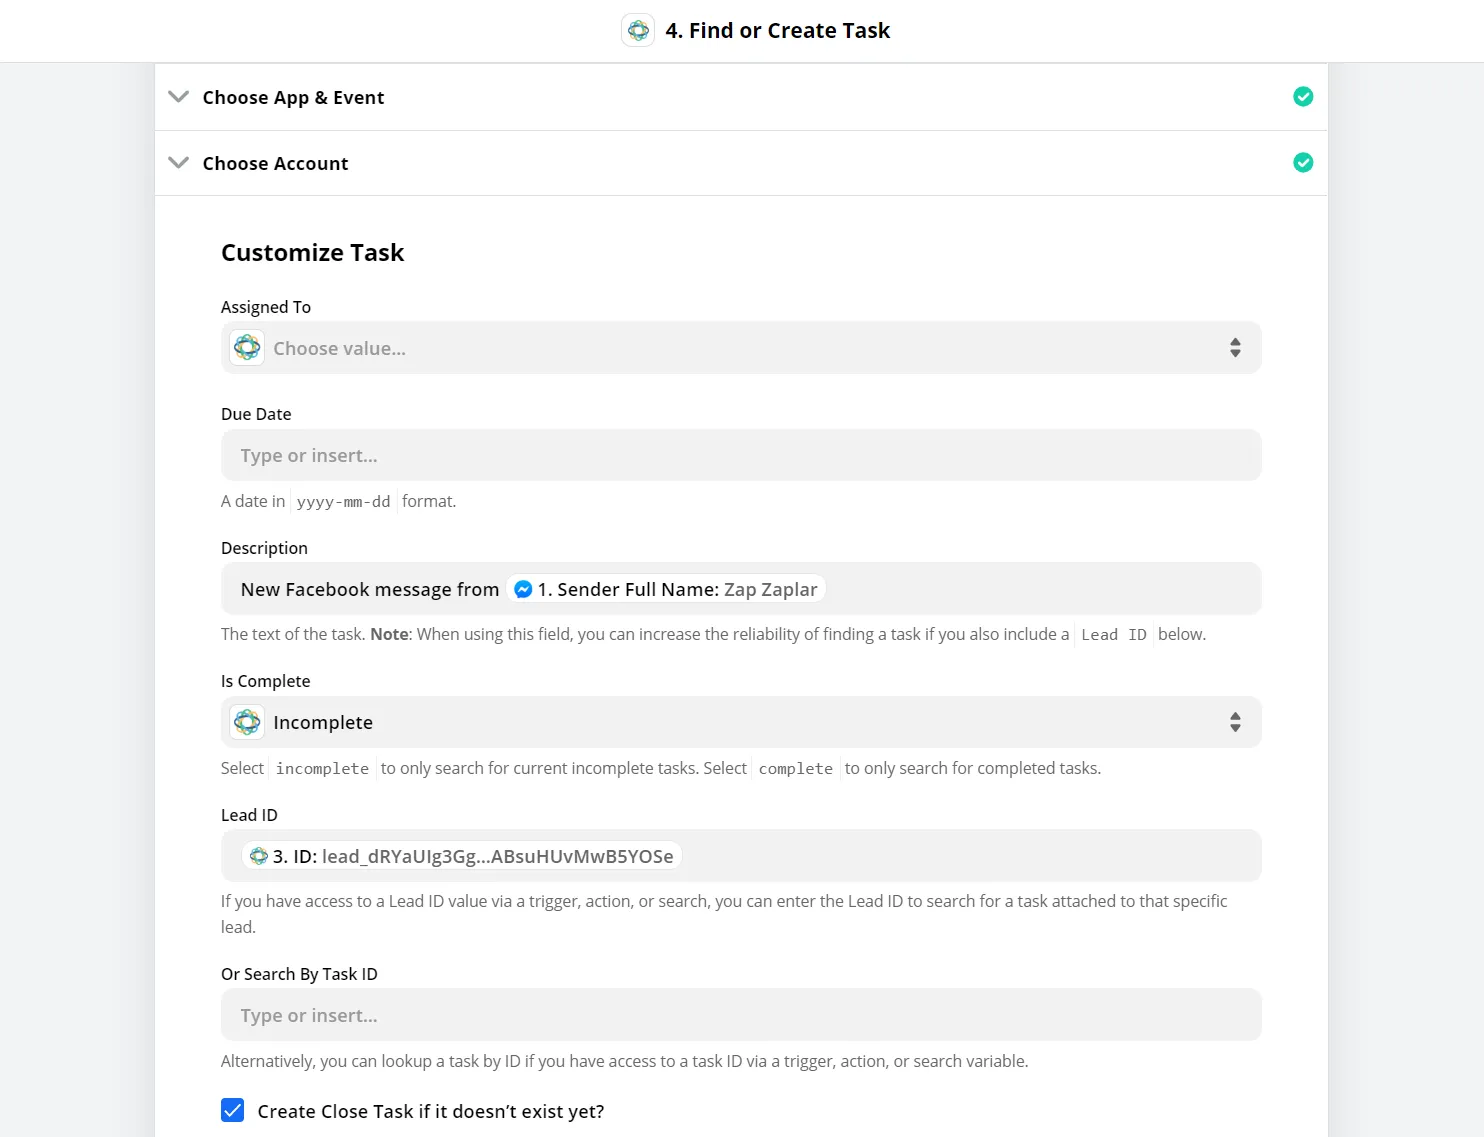 |
Enter some text for the Task. We recommend something like this:
Select “False” under the “Is Complete” dropdown.
Under “Assigned To” select “Custom” and “User ID” from step 2. Under “Lead” select “Custom” and “ID” from step 3. Under due date enter “today”.
 |
Automatically reply to Facebook messages with the right info
One of the benefits of a Facebook CRM integration is that you can use information from within Close to send smarter automated replies on Facebook Messenger. One use case would be to automatically check if a Facebook message is from an existing customer. If it is, then you can automatically reply and let them know that the customer support team will be in contact soon. If it’s not an existing customer, your automated reply might ask them to email a general account like info@yourcompany.com.
Create a zap, select Facebook Messenger and choose the Facebook Page that you’d like to use for this automation.
Select Close as the second app and “Find Lead” under the “Choose Action Event” dropdown. Under the “Customize Lead” tab, navigate to the “Or Use A Custom Search Query” field and input the following:
Select “Exact” in the “Exact Or Partial Match?” dropdown. Click the checkbox next to “Create Close Lead if it doesn’t exist yet?”
Select “Paths” as your next step in Zapier. This will create a branch in the automation that we’ll use to treat messages that came from existing customers different from all other messages.
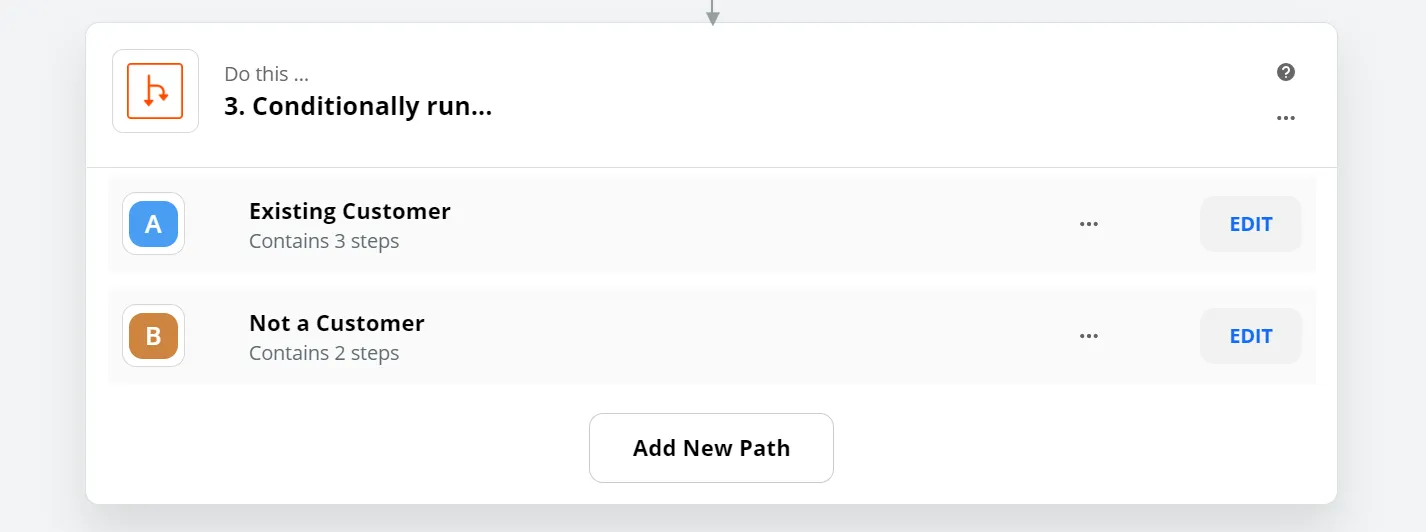 |
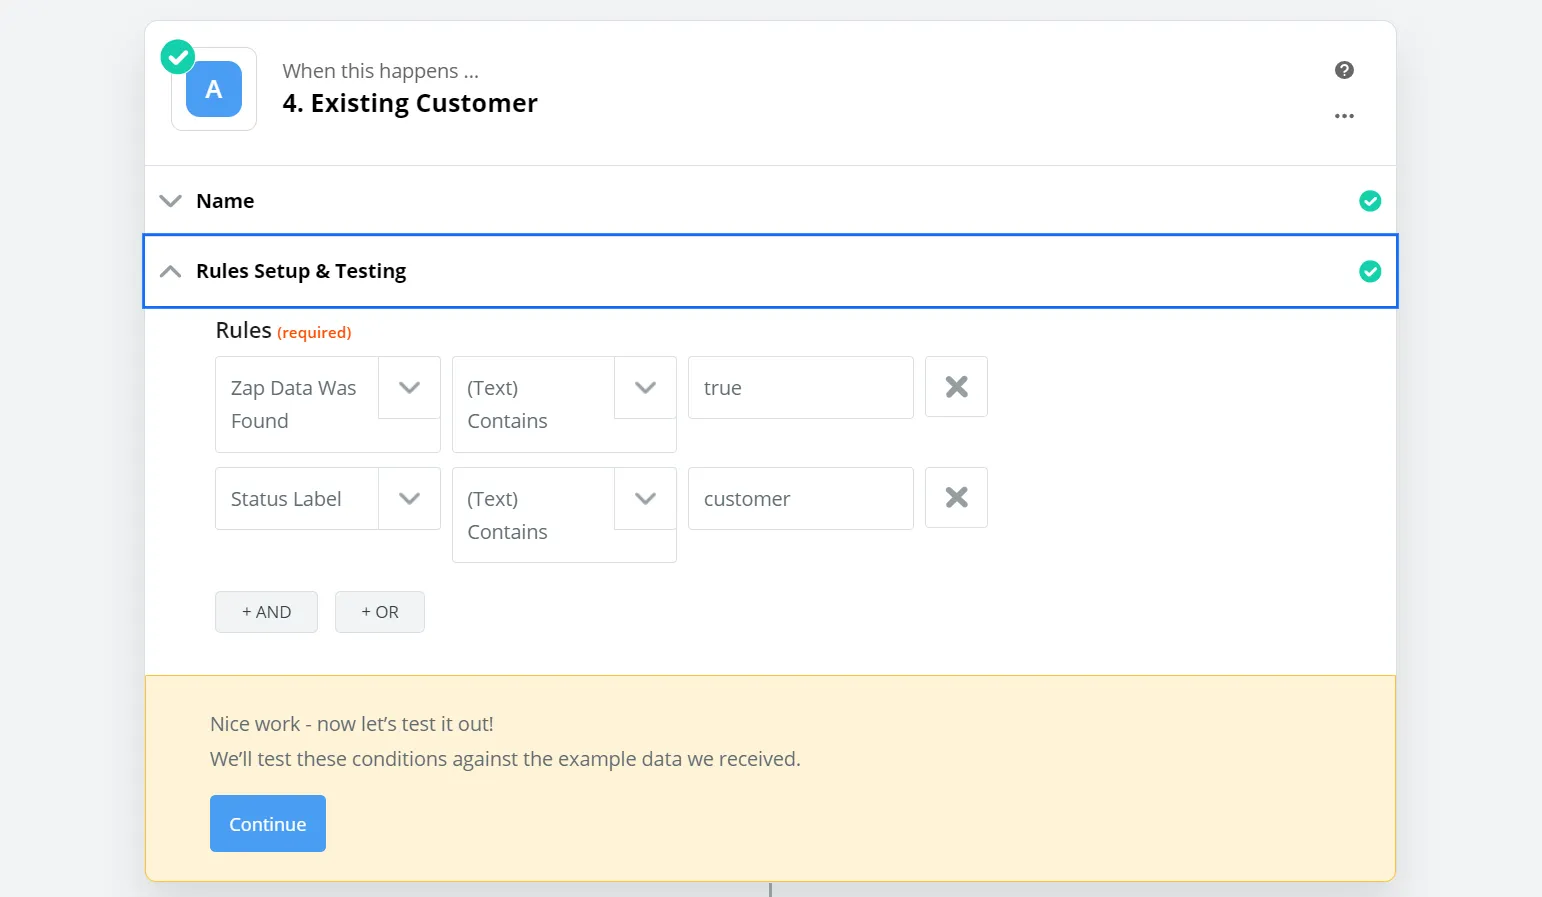
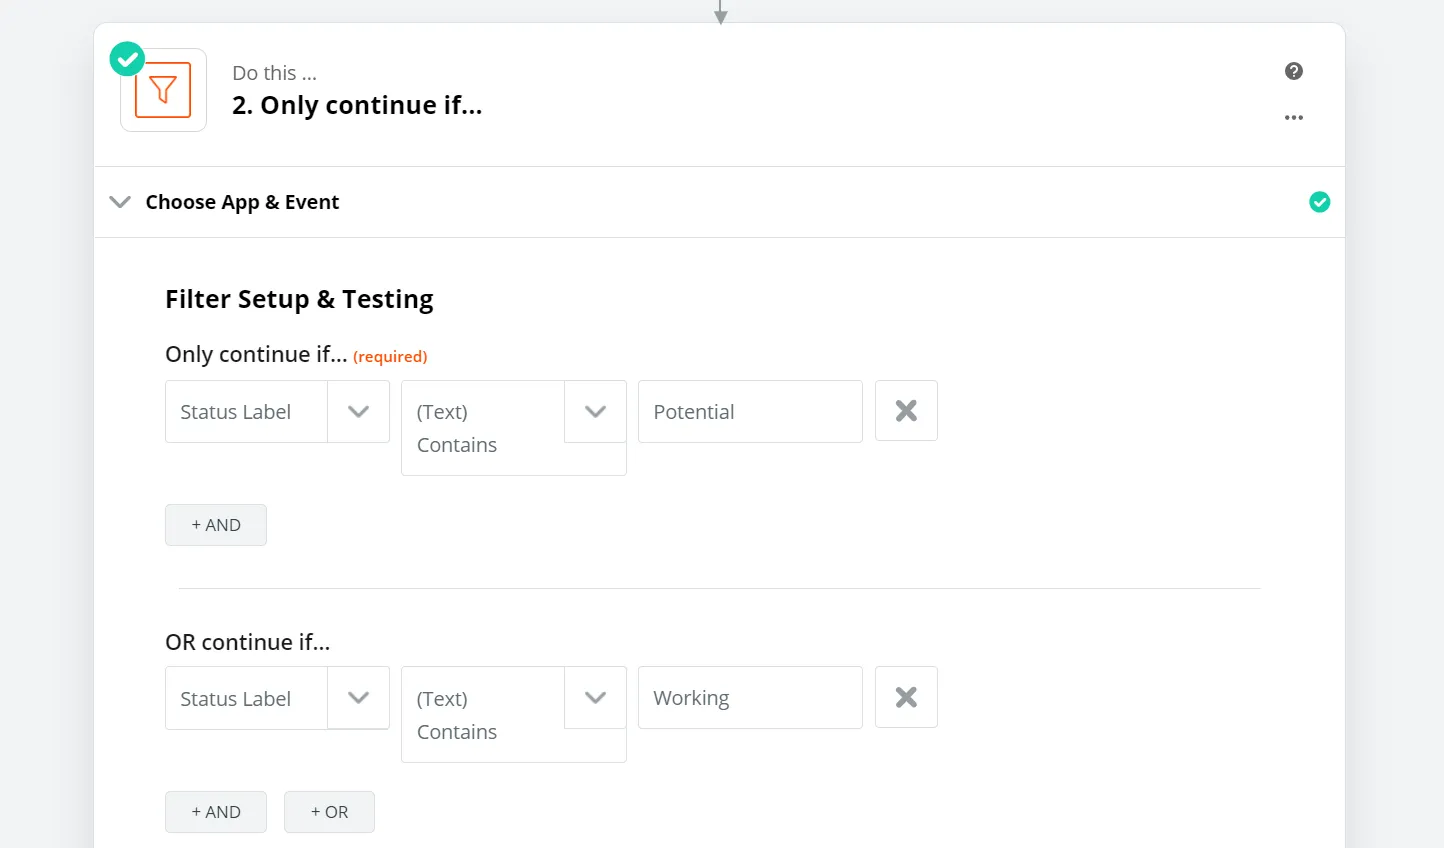
Name the first branch path “Existing Customers” and add the following rule:
This filter does two things. It checks if the person who sent the Facebook message was already a Lead in Close and looks at their Lead Status to see if it contains the word “customer”. If you have different Status Labels in place to indicate that someone is a customer, then you should use that label instead of “customer” in the filter above.
 |
Continuing down that same path, add Facebook Messenger as your next app to perform an action in. Under the “Customize Message” tab, select the Page you’ll be sending the message from and the Recipient ID from step 1.
Next you’ll enter the Facebook message that you’ll send back to this existing customer. Here’s a sample message you can use:
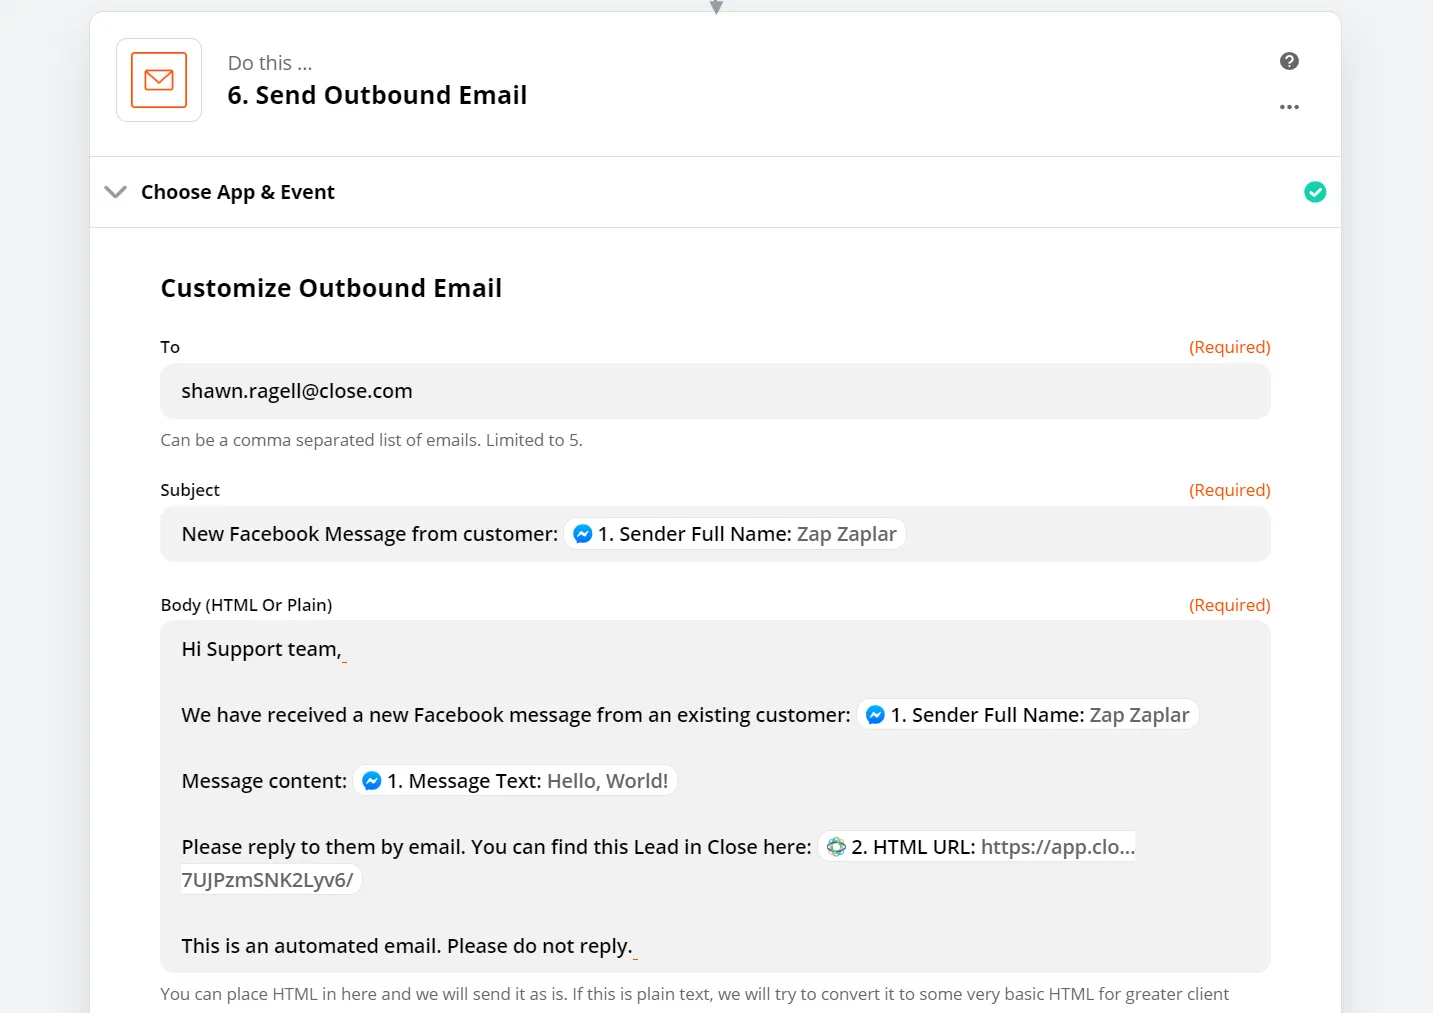
Your next step in this path depends on how your Customer Support team would like to be notified of this customer’s message. Many support teams rely on a shared inbox, so you could choose to send an email automatically.
To do that, select Email by Zapier as your next app in the path. Input the customer support email address in the “To” field. Create a relevant subject line and then customize the email body. Here’s a sample email template you can use:
 |
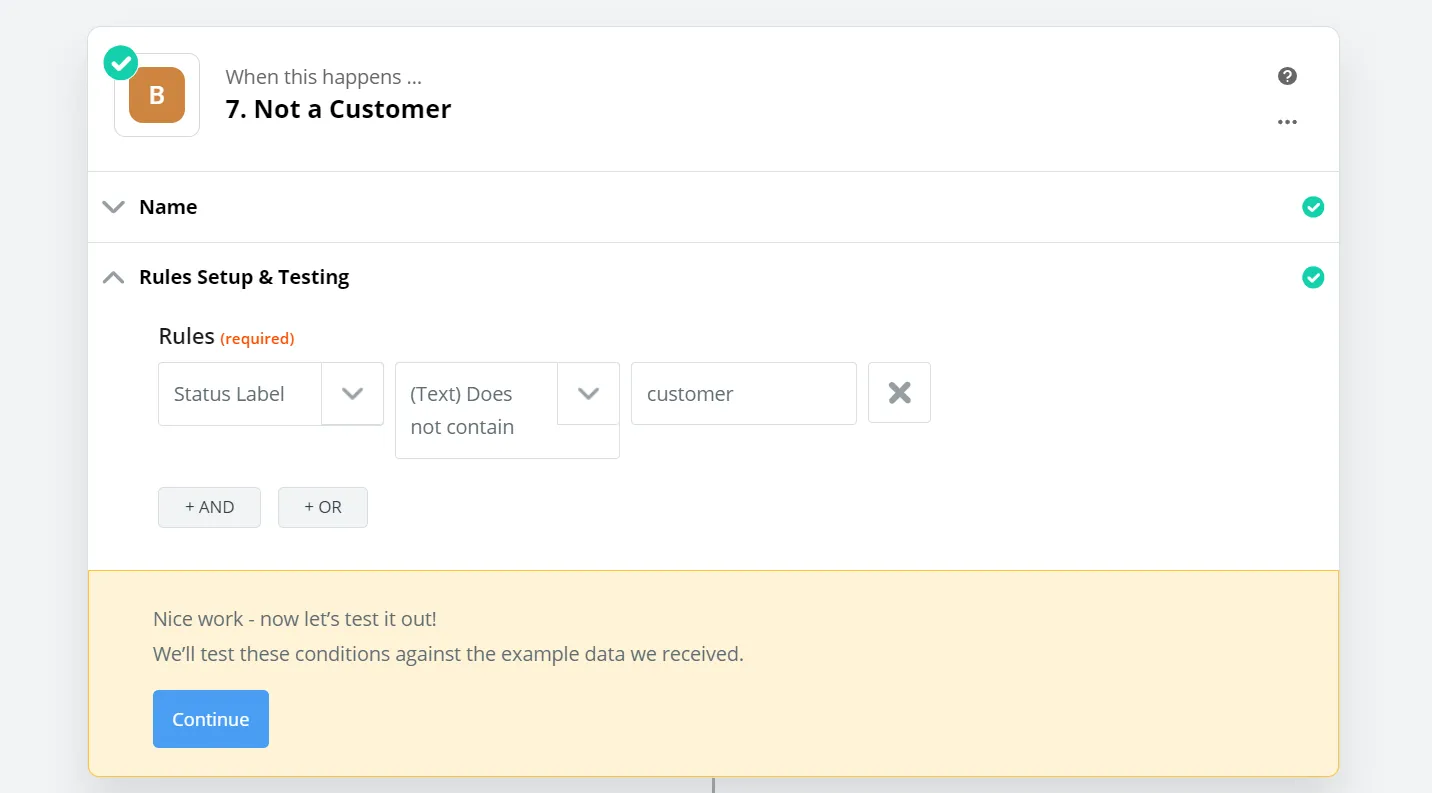
Exit out of this path in the zap and start editing path B. You can name this path “Not a Customer”. Use the following filter in the “Rules” tab:
This filter checks if the Lead that was found/created in Close has the Status Label of “customer”. Again, if your company uses different Status Labels for customers, then use that nomenclature instead here.
 |
Add a new step to that path and choose Facebook Messenger as your next app. Under the “Customize Message” tab, select the Page you’ll be sending the message from and the Recipient ID from step 1.
Enter the Facebook message that you’ll send back to this person. Here’s a sample message you can use:
 |
That’s it! Now whenever a customer messages your company page on Facebook, your customer support team will be notified. If the message comes from someone that isn’t a customer, they’ve been instructed to email you instead. This frees up someone from having to keep an eye on multiple inboxes on different platforms.
Add Leads or Customers to a Custom Facebook Audience
Facebook Custom Audiences are a powerful tool for your marketing team to target Facebook ads to certain groups of people. Using this Facebook CRM integration, you’ll be able to automatically add new Close Contacts to your team’s Custom Audiences.
This can be helpful for a few different scenarios. You could set up a custom audience that specifically targets potential customers that you’re currently prospecting to. You could also set up a separate custom audience and have Close automatically add your customers to it in case you want to run Facebook ads about a new feature or to use as a black list so that customers don't see your ads.
For this example, we’ll be adding all new prospects to a custom audience so that a marketing team can target them with ads.
To get started, create a new zap, select Close and “New Lead” under “Choose Action Event”. Under the “Customize Lead” tab, use the “Status ID” dropdown to select the appropriate status for leads that you’re currently prospecting to.
If you have multiple lead statuses for different types of prospects, do not use the “Status ID” dropdown. Instead, use the Filter by Zapier app and add the appropriate status labels to the filter:
 |
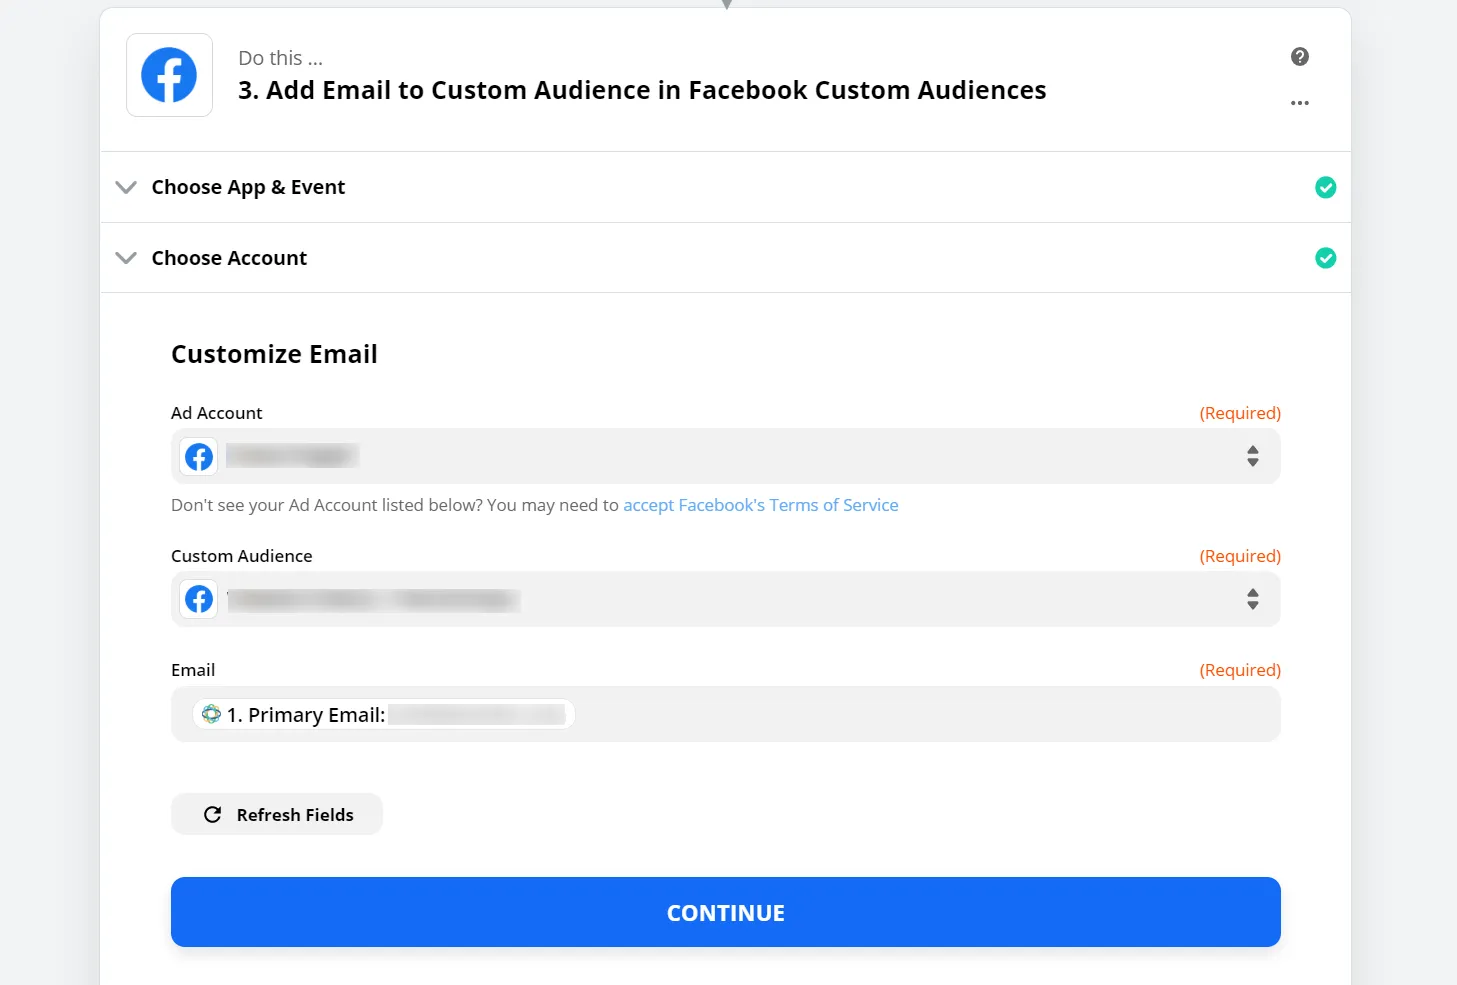
Next, select Facebook Custom Audiences as the next app in your zap. Select “Add Email to Custom Audience”. If you don’t already have a Facebook Custom Audience set up in your Facebook advertiser account, you should do that now using these instructions.
Select the existing custom audience that you want to add this lead to and then use the email address from step 1 in the “Email” dropdown.
 |
That’s it!
If you have multiple Custom Audiences to build up, you can create a path after the first step of this zap to filter for prospects versus existing customers and add them to different custom audiences.
Add a Note to Close When a Lead Posts on Your Page
Your CRM is meant to be a record of EVERY interaction you have with a prospect or customer. If they post on your Facebook page, you’ll want to have a record of it. Whether that post is a compliment, complaint, or question, it will inform your next interaction with them.
Start a new zap, then select Facebook Pages and “New Post to Your Timeline” under the “Choose Action Event” dropdown.
Select Close as the next app and choose “Find Lead” under the “Choose Action Event” dropdown. In the “Customize Lead” tab, navigate to the “Or Use A Custom Search Query” dropdown and input the following:
Select “Exact” in the “Exact Or Partial Match?” dropdown and leave the checkbox next to “Create Close Lead if it doesn’t exist yet?” unchecked.
 |
Select Close as the third app you want to connect and choose “Create Note” in the “Choose Action Event” dropdown.
Under the “Customize Note” tab go to the “Lead” field, select “Custom” and “ID” from step 2. Under “Text”, select the Facebook message from step 1.
 |
Now, whenever a lead posts on your Facebook Page, a note will be added to your CRM.
Facebook CRM Integration: Centralizing all communication
Centralizing your communication and data using a Facebook CRM integration optimizes workflows and keeps your team focused on what’s important - closing deals!
With the automation flows described above, data entry and manual processes to accommodate Facebook are a thing of the past.
Connect your Facebook activity to the CRM designed for high growth teams. Start your 14-day free trial of Close now.